How to setup a Windows 11 virtual machine using VMware Workstation Pro.
This is a complete, step by step guide to installing a Windows 11 virtual machine. You’ll need to have Workstation Pro installed on your computer and a Windows 11 ISO image file before starting.
Downloading A Windows 11 ISO
To create a Windows 11 virtual machine, you’ll need a copy of the ISO image file. You can download it direct from Microsoft here –
https://www.microsoft.com/en-us/software-download/windows11
Use the Media Creation Tool to download a Windows 11 ISO to your computer. Workstation Pro will use the ISO file to install the virtual machine.
Setting Up A Virtual Machine In Workstation Pro
Creating a virtual machine (regardless of which operating system you’ll be installing) is a two part process.
Firstly you need to create, or setup, the virtual hardware for the VM. The virtual CPU, RAM, hard disk etc.
Then once you have a virtual computer, you can install the operating system onto it. We’ll go through each step below.
Windows 11 Virtual Machine Setup
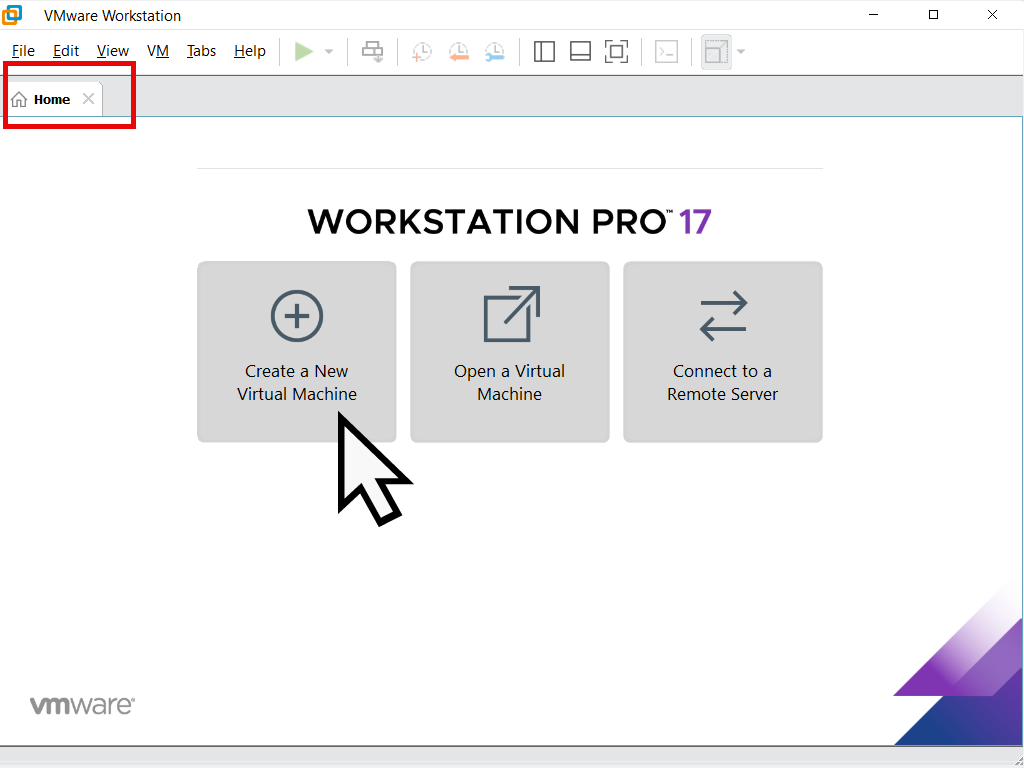
Launch Workstation Pro, if this is your first VM, you’ll be on the Home screen. If you have previous VMs, then click the Home tab to get to the Home screen.
Click the Create A New Virtual Machine button.
New Virtual Machine Wizard
The New Virtual Machine Wizard screen will appear. Select the Typical (recommended) setting and then click the Next button.
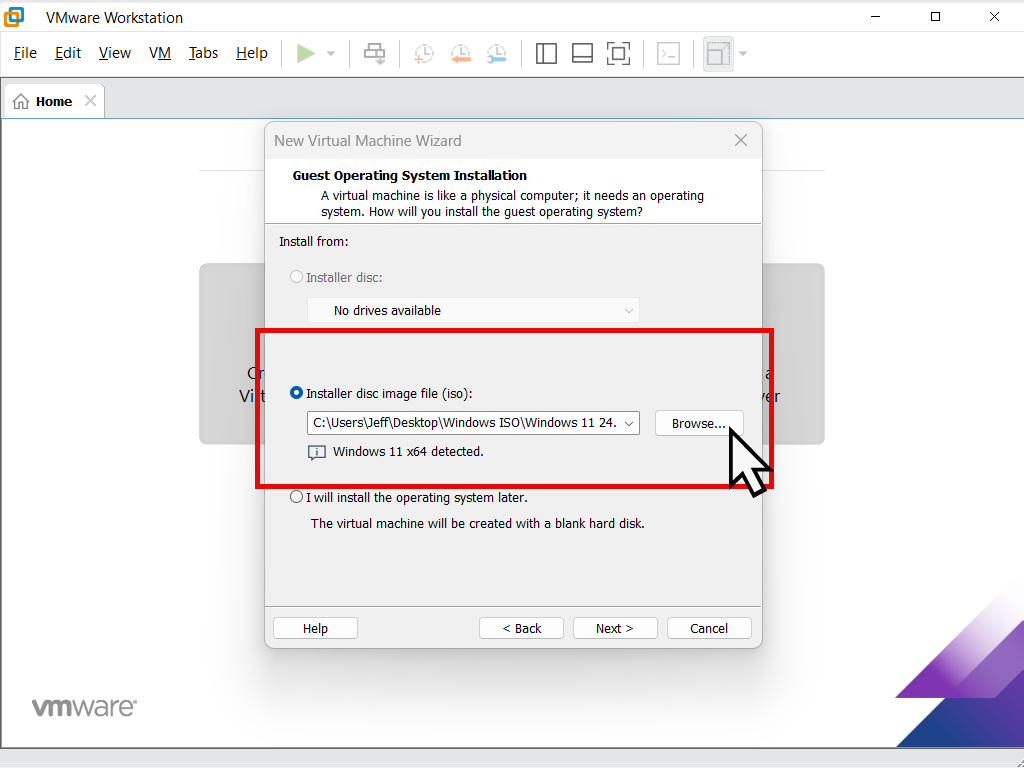
On the Guest Operating System Installation screen, select Installer Disc Image File (ISO). Then click the Browse button.
Navigate to and select the Windows 11 ISO image file you downloaded earlier. Workstation Pro will recognise the ISO as a Windows 11 install. Click the Next button.
Windows 11 VM Name And Location
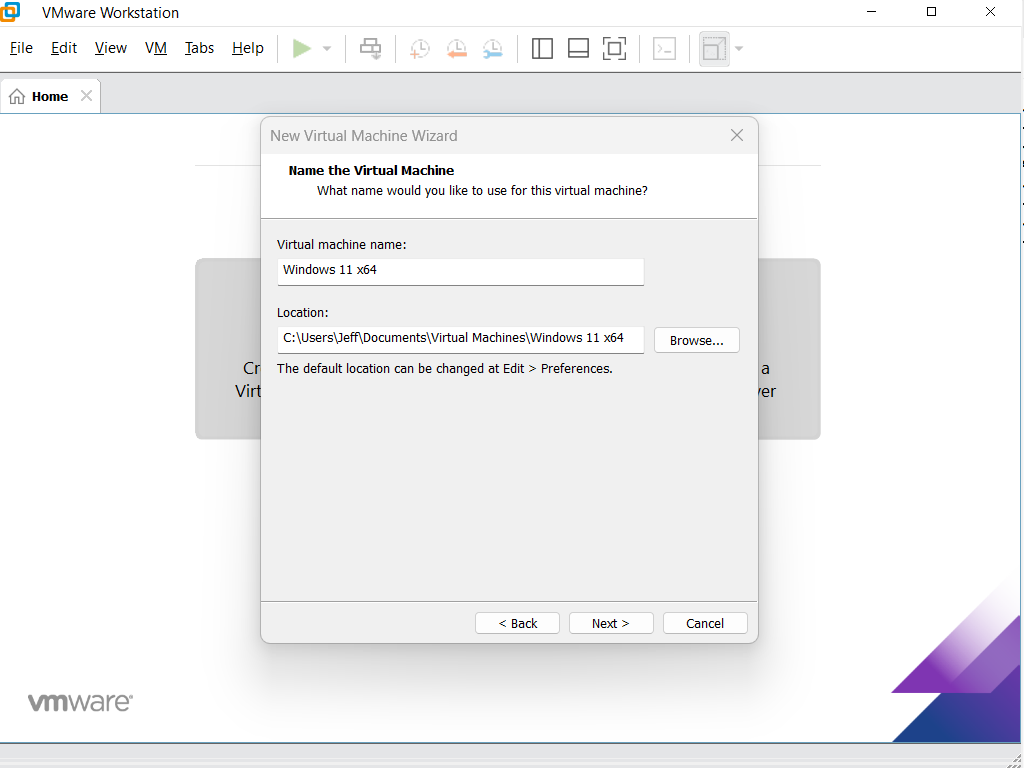
By default Workstation Pro will name the new VM as Windows 11 x64. That’s going to be fine if you only intend to have a single Win 11 virtual machine, but it might get confusing if you’re going to use more than one. You can change the name to something more descriptive if you wish to.
Note that this name is only for identification purposes when launching virtual machines.
The completed VM will be stored in your Documents folder, e.g. C:\Users\Username\Documents\Virtual Machines. that can be changed by clicking the Brows button and then selecting a different folder or drive.
For this guide, I’ll just leave it the defaults. Click the Next button when you’re ready.
Windows 11 VM Encryption Information
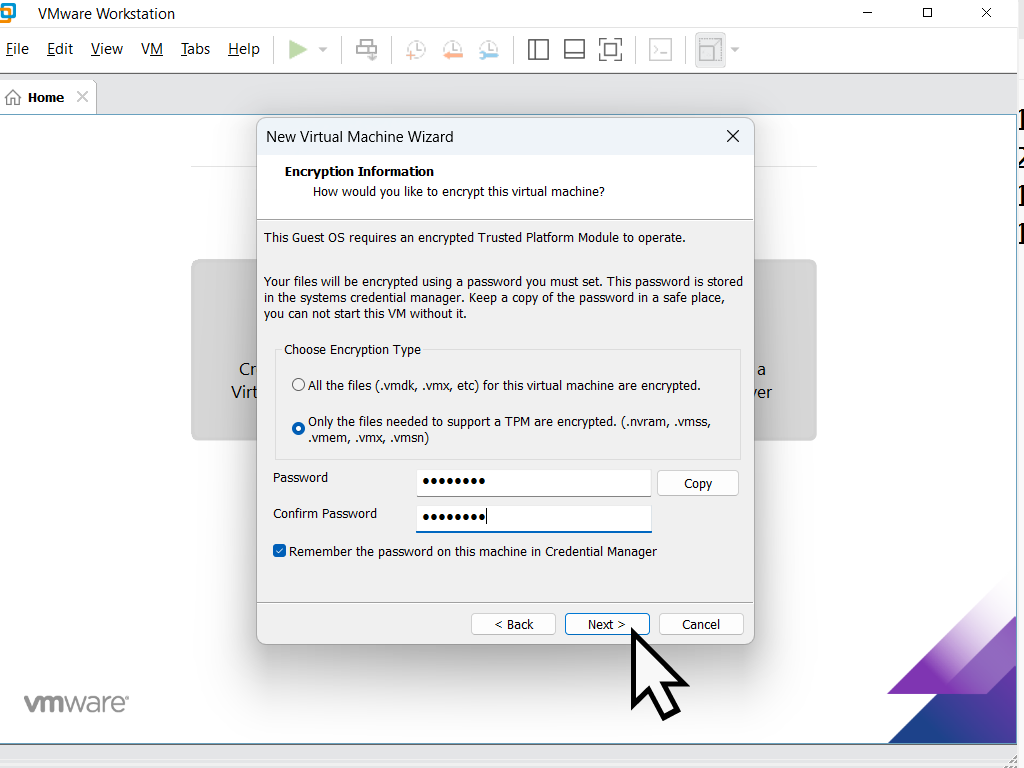
As you’re probably aware by now, Windows 11 requires a TPM (Trusted Platform Module) in order to install. Workstation Pro will emulate a TPM, so even if your host computer doesn’t have one, you can still setup a Windows 11 virtual machine.
You need to enter a password in order to “unlock” the virtual machine and allow it to boot up. You can click the Generate button to have Workstation Pro insert a very secure password if you wish, but since this is for a home VM, I’d just type in a simple password that you can remember.
Select “Remember the password on this machine in Credential Manage” . Then click Next.
Specify Disk Capacity
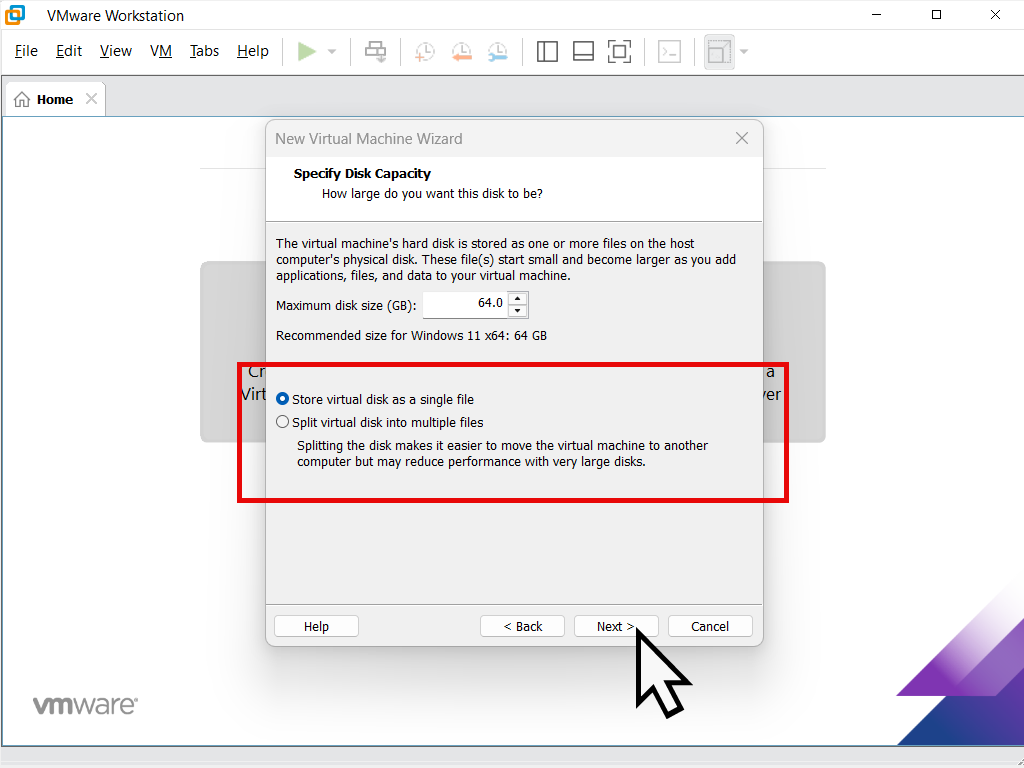
The virtual machine will need a virtual hard disk. You change it from the default 64GB but unless you know that you’ll need more capacity I’d leave it for now. You can always increase the capacity later if needs be.
Select “Store virtual disk as a single file”. Storing the disk as multiple files does have an effect on performance once the operating system is installed. Click the Next button to proceed.
Ready To Create Virtual Machine
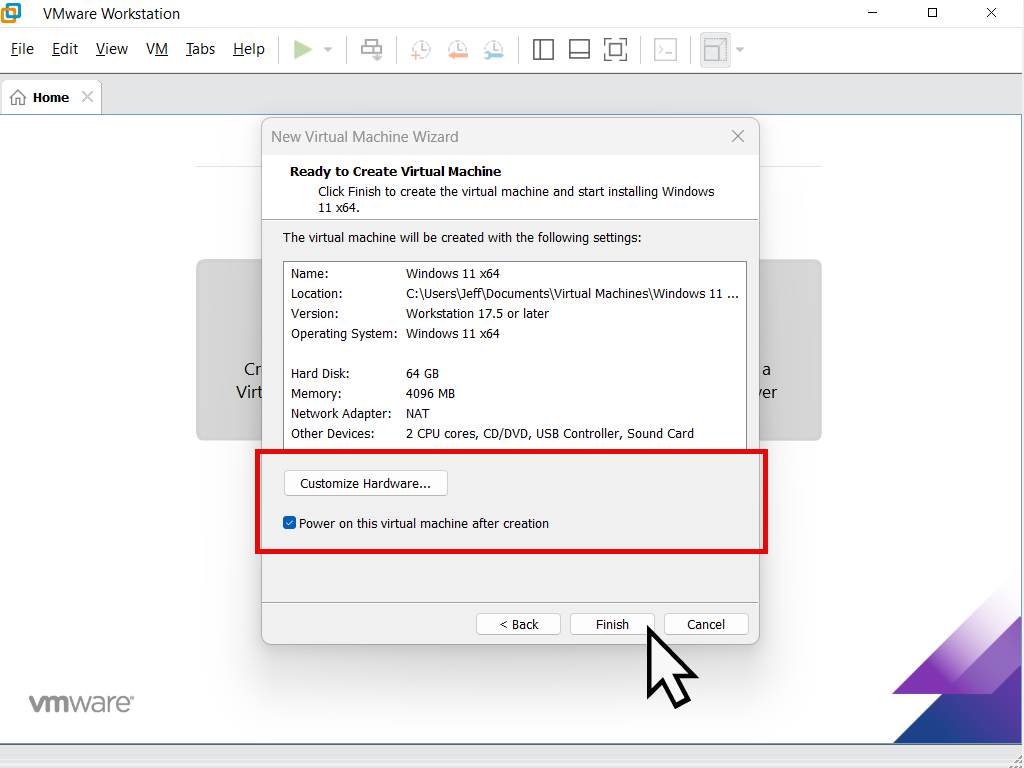
Workstation Pro will present you with a confirmation screen for the Windows 11 virtual machine. The default values are usually good enough. But you change any of them by clicking the Customise Hardware button.
Note that you can always change any of these settings later when you’ve got Windows 11 installed as a VM.
Make sure that “Power on the virtual machine after creation” is selected and click the Finish button.
You’re new virtual machine will be created and then it’ll boot from the Windows 11 ISO file so that you can install the OS.
How To Send Keystrokes To Virtual Machine
Before the Windows 11 setup begins to load on the virtual machine, you’ll be prompted to “Press any key to boot from Cd or DVD”. Which means you’ll need to send your keystrokes and mouse clicks to the virtual machine.
To send keystrokes, left click once inside the VM window. Then when you “press any key etc” the keystroke will be sent to the VM and it’ll load the Windows 11 setup files.
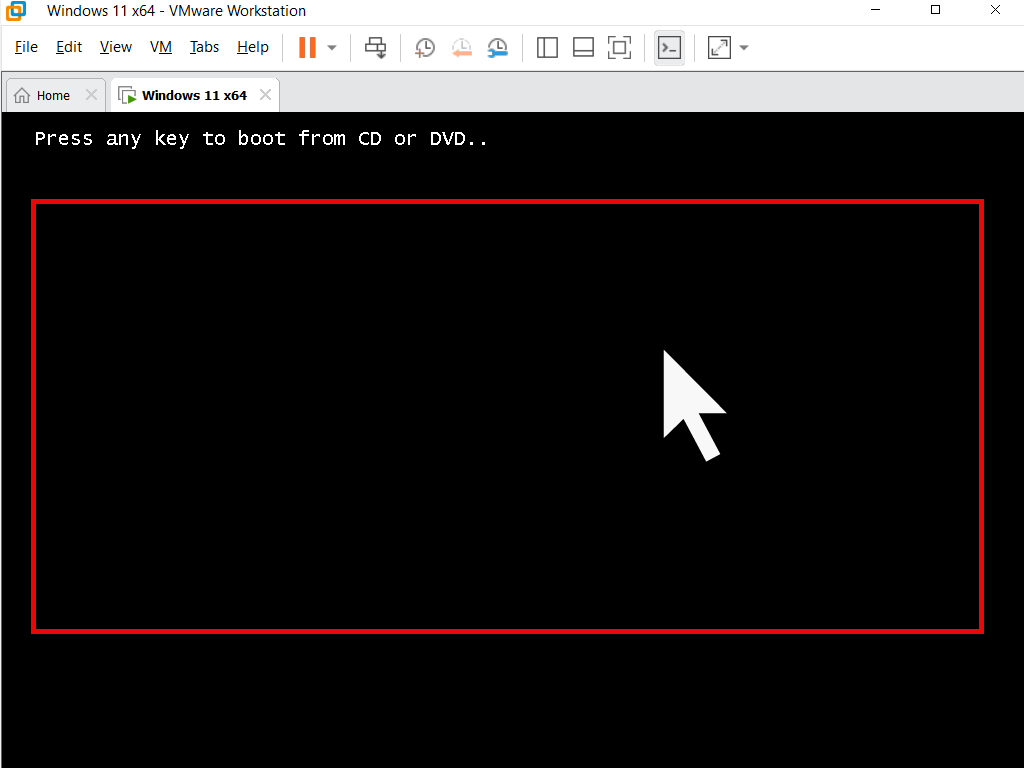
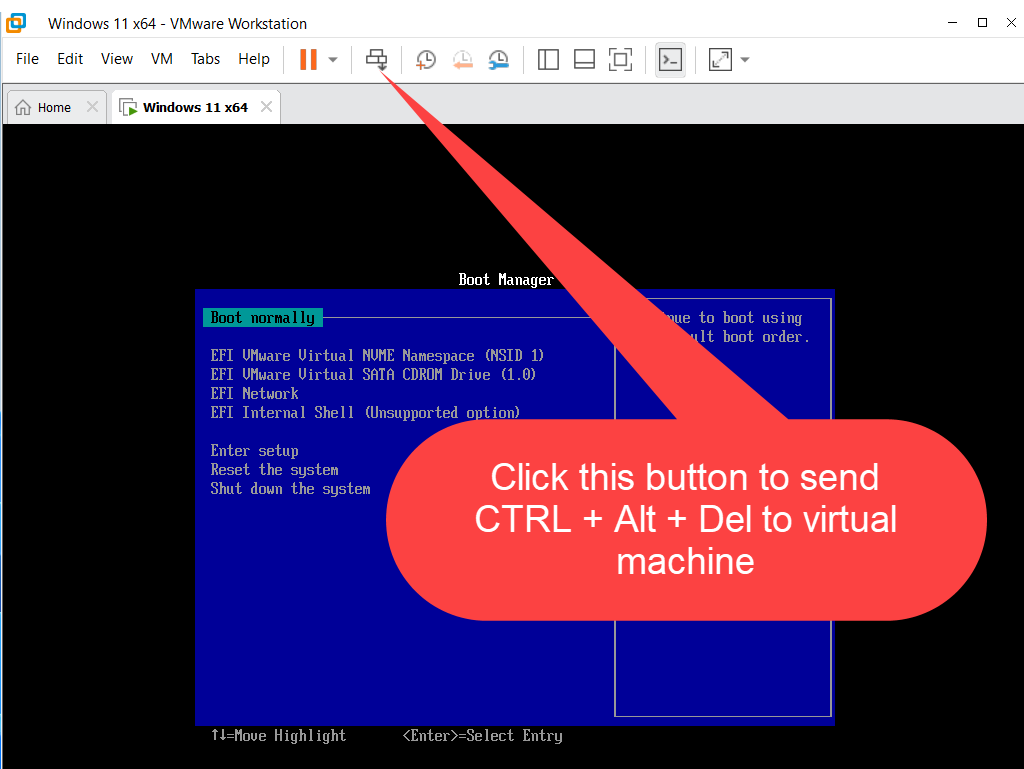
The “Press any key” prompt doesn’t hang around for long, just a few seconds and it’s easy to miss it.
If that happens, send a CTRL + Alt + Del signal to the virtual machine to reboot it. And this time be ready to click onto the VM window and then press a key on your keyboard.
Install Windows 11 On Virtual Machine
Installing Windows 11 onto a virtual machine is exactly the same as installing it on to a “real” bare metal computer. If you’re familiar with installing Windows then you can skip this section.
For those that are doing this for the first time, I’ll walk you through the main screens that you’ll see and show you what to do on each.
Installing The Windows 11 VM
The first couple of screens that appear will allow you to select your language and keyboard settings. These’ll probably be set to your own region and so you can just click the Next button for each one.
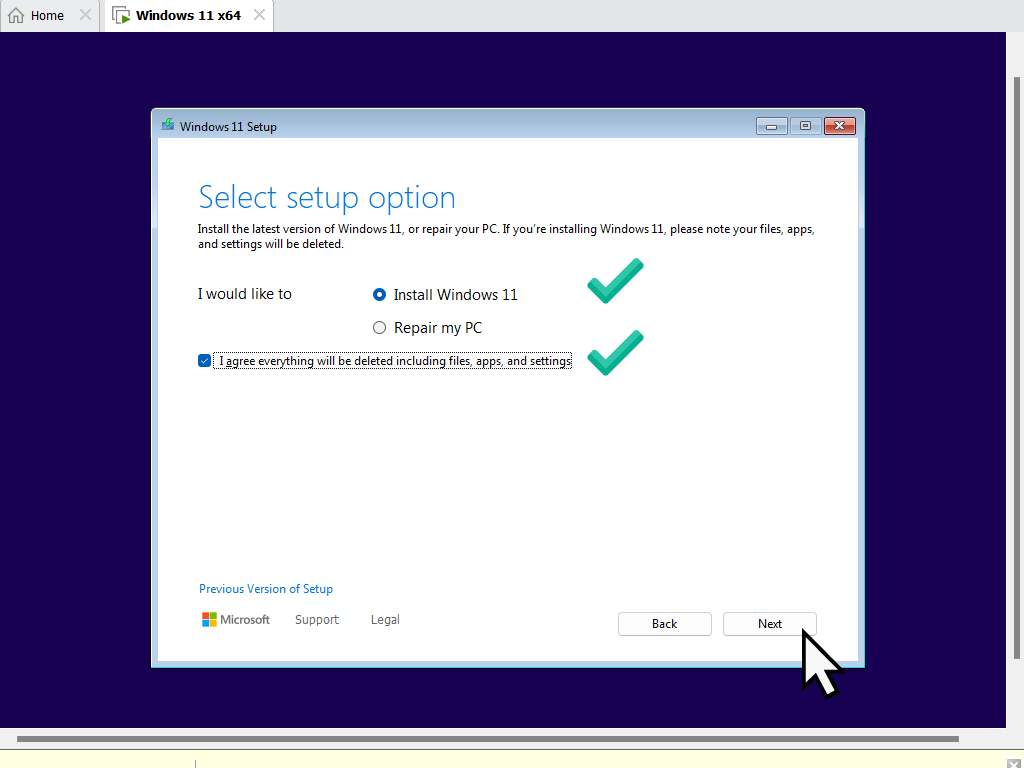
After that the Select an Option screen will open. Select Install Widows 11 and then check “I agree everything will be deleted including files, apps and settings”.
Although this sounds drastic, you’re not installing Windows 11 on to your real computer (the host). You’re installing it on to the virtual hard disk that you created earlier. That disk doesn’t have anything on it as yet.
The Product Key
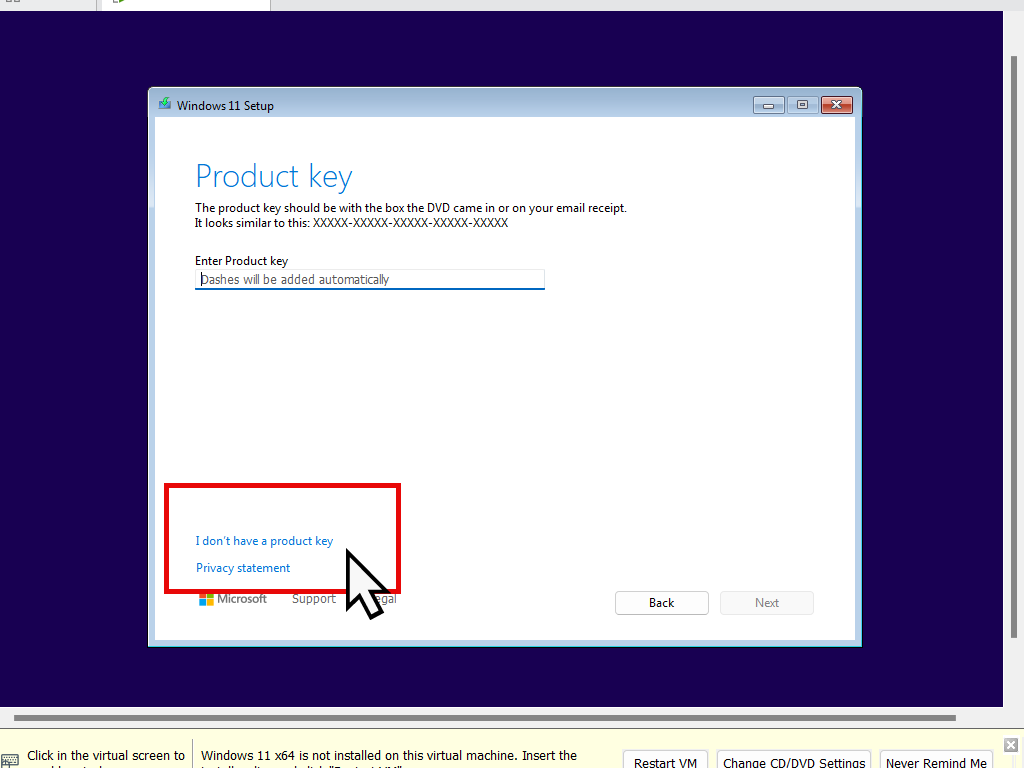
Windows 11 isn’t free. You do need a product key (serial number) in order to activate it. Or at least you should have one. In effect Windows 11 works just fine even if it isn’t activated. But you should activate it.
Personally I never enter the product key here (during setup). There’s so much that could go wrong.
Click the “I don’t have a product key” link.
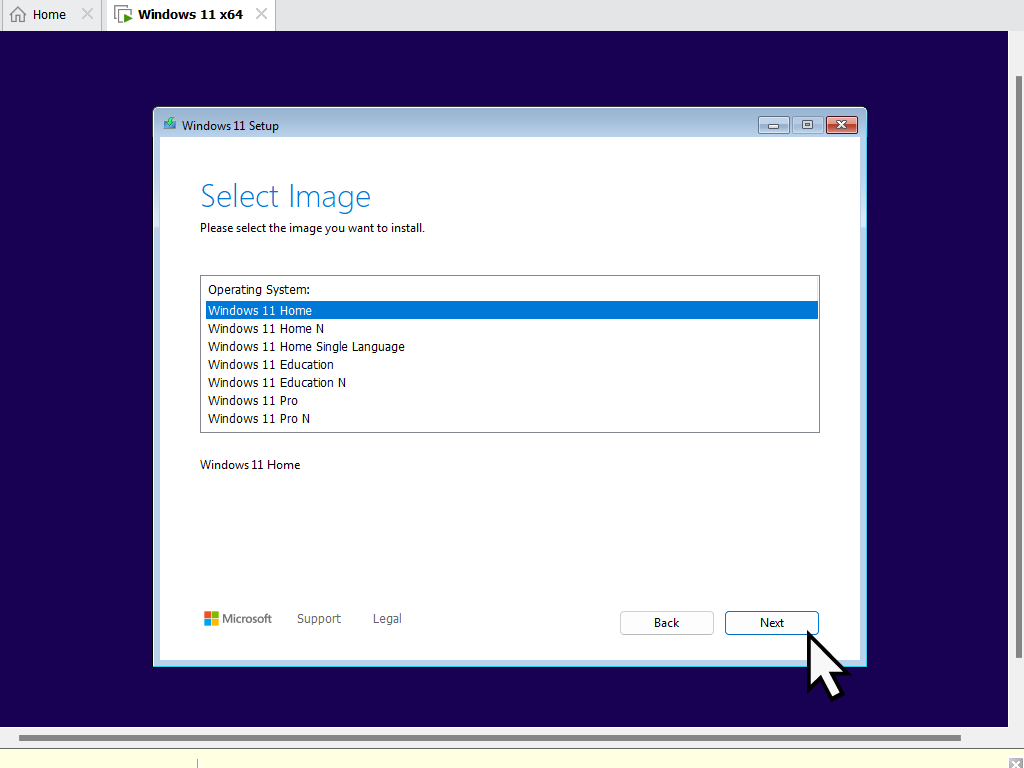
If you entered a product key on the previous page, then you won’t see this screen. Each product key relates directly to a specific Windows 11 edition.
But if you followed my advice and clicked “I don’t have a product key”, then you’ll need to select which edition, or version, of Windows 11 you want to install on the virtual machine.
The most popular and easiest are either the Home or Pro editions.
Select Location To Install Windows 11
After choosing which version of Windows 11 (Home or Pro) that you want to install, you’ll need to accept the licence terms.
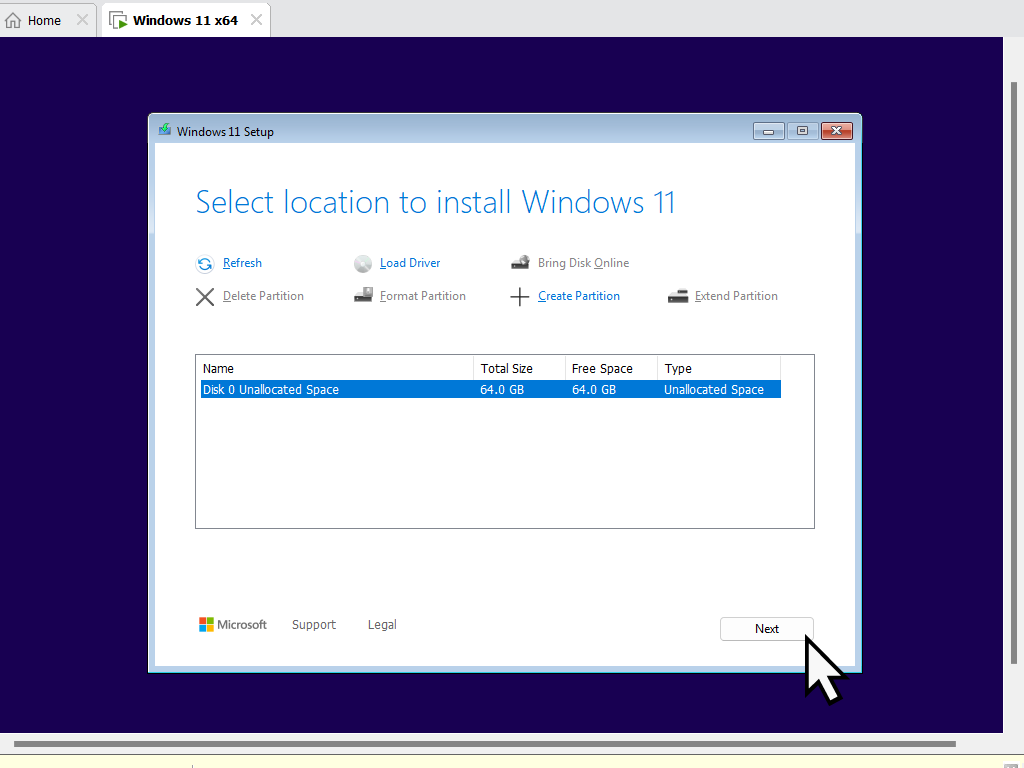
Then select a location for Windows 11. Virtual machines operate inside their own environment and are completely unaware of the host computer.
The location is going to be on the virtual hard disk that you created earlier. So you don’t need to change anything here, just click the Next button.
Ready To Install Windows 11 On VM
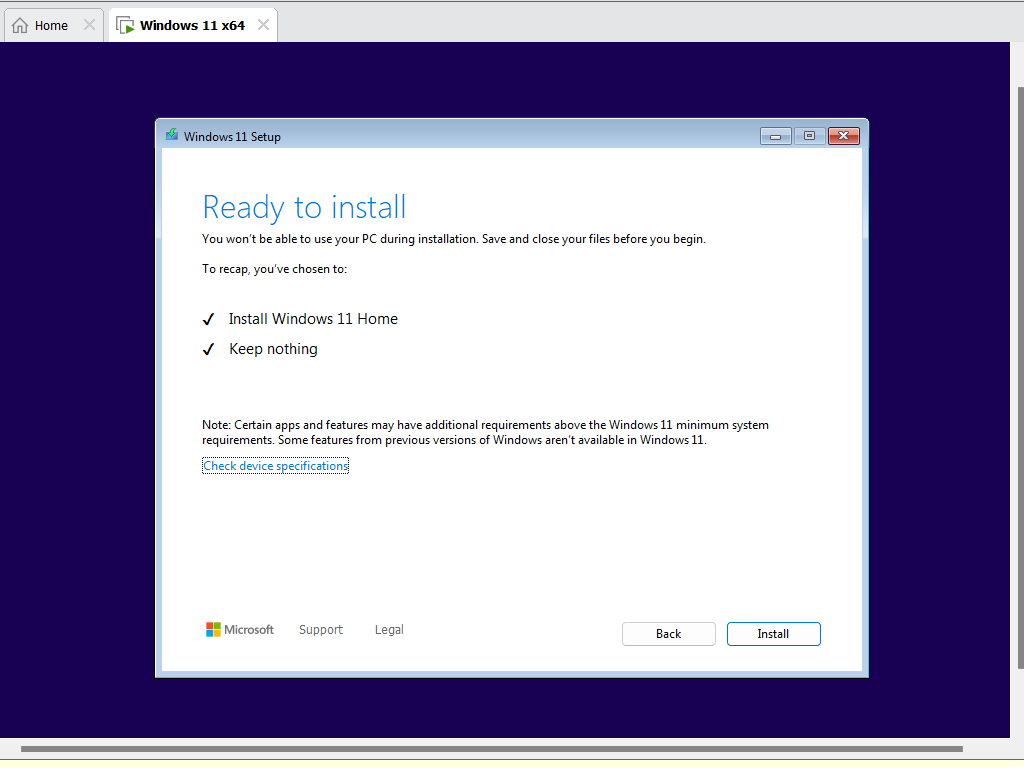
Ok so now you’re ready to install Windows 11 on to your new virtual machine. Click the Install button.
Windows will begin installing itself and might re-start your VM several times. There’s not much for you to at the moment other than wait. Generally it won’t take long, maybe 5 to 20 minutes or so, depending on your host computer.
Setting Up Windows 11 On Virtual Machine
Windows 11 will install itself and then reboot the virtual machine.
Then you’ll have a little setting up to. This is just the usual setting up that you’d have to do on any computer when installing Windows 11. t isn’t anything that’s specific to virtual machines.
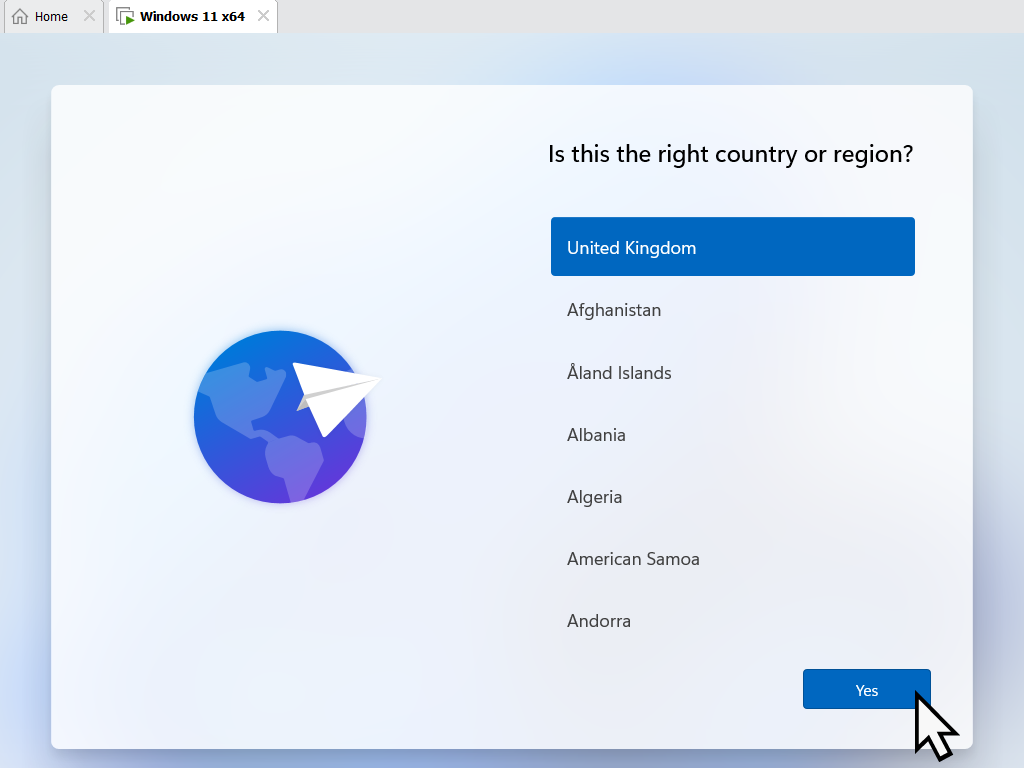
Firstly you’ll be asked if your country or region are correct, assuming they are click the Next button. That’ll be followed with your keyboard layout, again click Next.
After that Windows 11 will check for updates. The updates will be downloaded and the VM rebooted.
Name Your Device
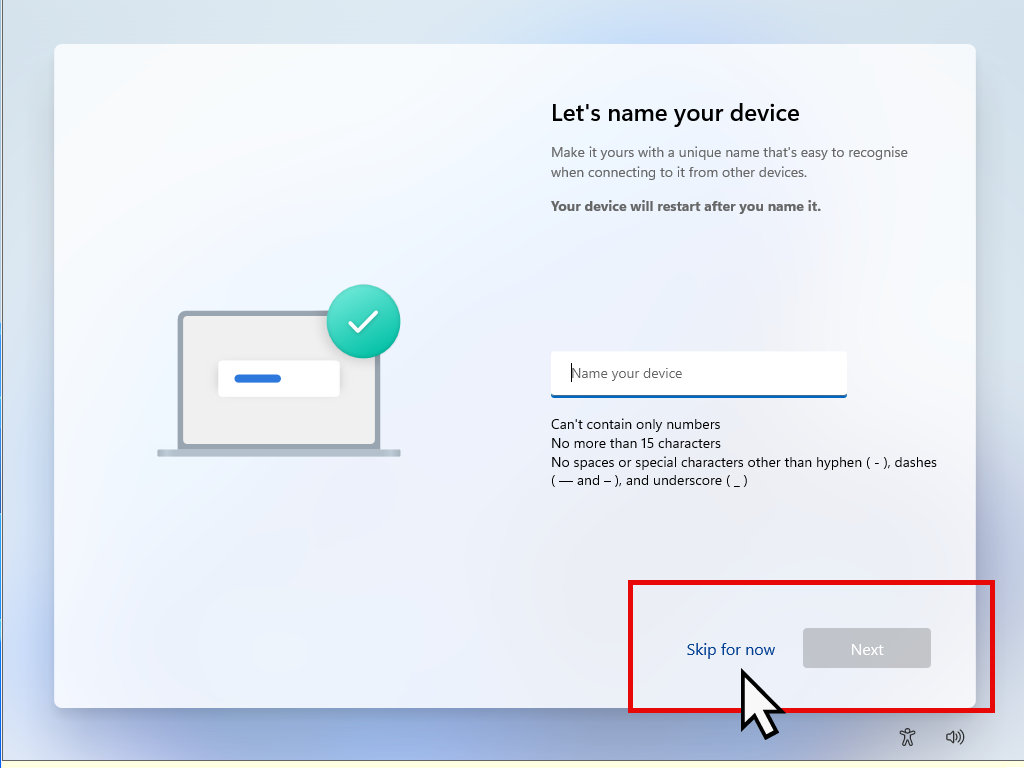
You can give the Windows 11 virtual machine a name if you want to, or click the Skip For Now link at the bottom of the screen.
Note that this name is not the same as the name that you set up earlier when creating the virtual machine. You can use the same name, a new name or if you’re unsure, just “Skip for now”.
The VM will check for more updates again, which will take some time to complete.
Signing In To Windows 11 VM
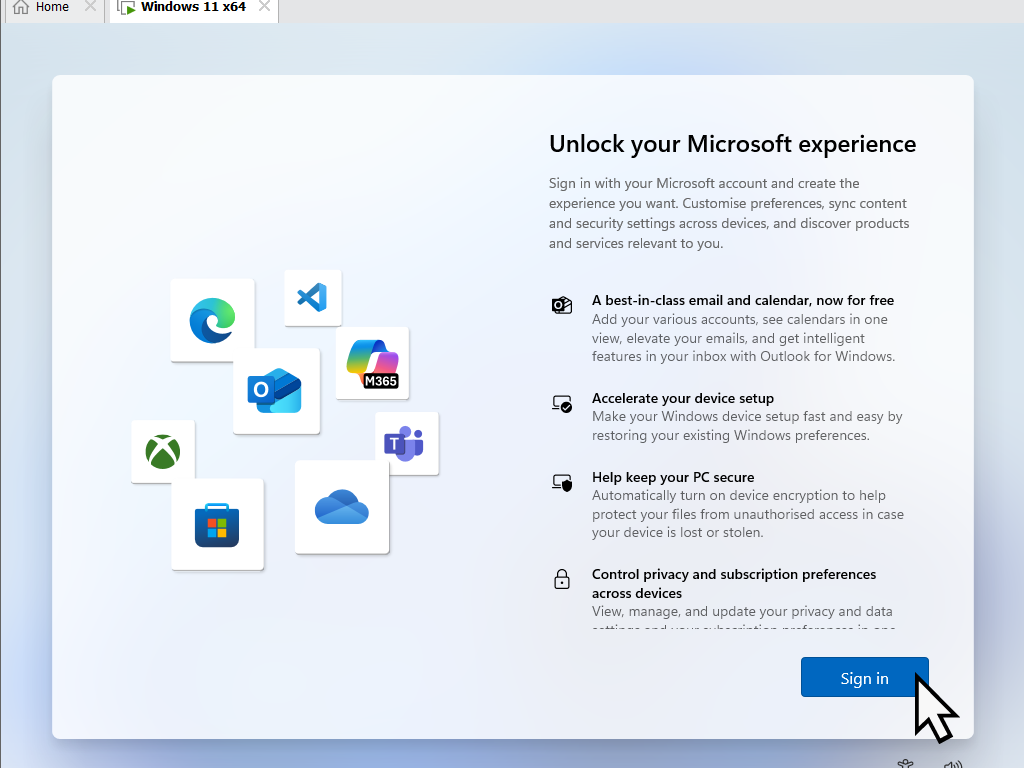
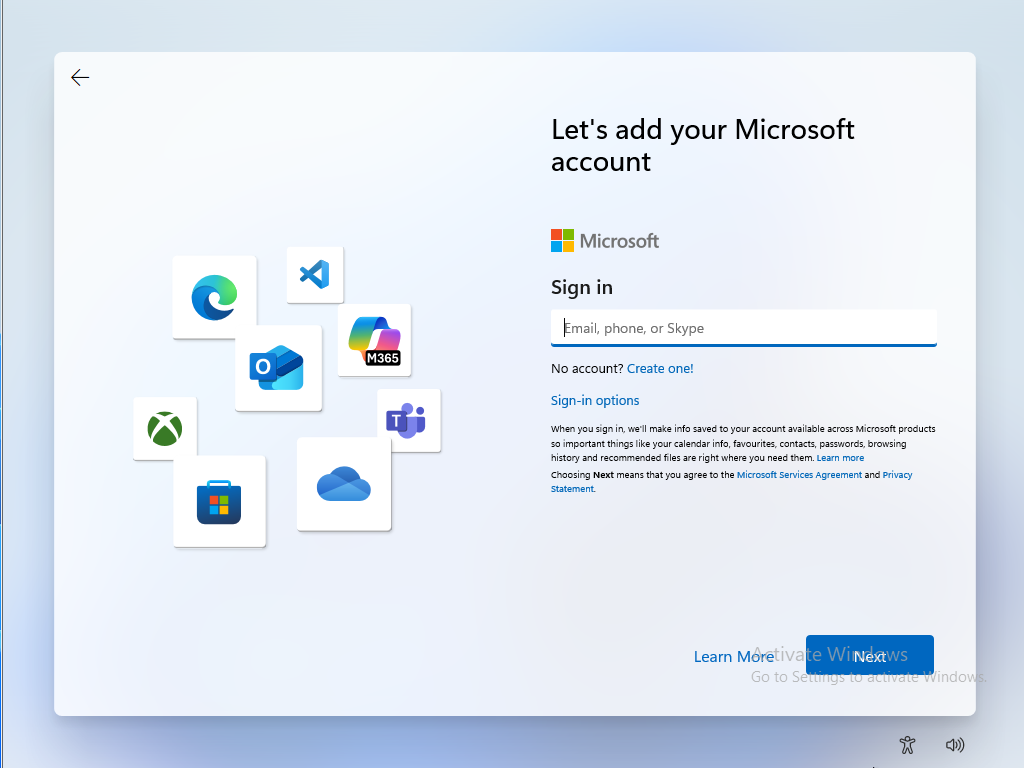
When the updates have completed and the VM has rebooted you’ll be presented with the “Unlock your Microsoft experience” screen. This is where you create an account to sign in to the virtual machine.
There’s no other option here so click the Sign In button.
Microsoft Account Or Not
As you’re probably aware, Windows 11 practically forces you to create, or sign in with, a Microsoft account. At this point you have 3 options.
- Use your own MS account – You can sign in with your own Microsoft account. Although there’s nothing intrinsically wrong with this option, you have to consider that this is a virtual machine. It really all depends on what you intend to use the VM for. Using a Microsoft account does expose you to all the privacy concerns that go with it.
- Create a new MS account – You could create a new account just for use with the Windows 11 virtual machine. That might help a little where privacy is concerned.
- Sign in with a local account instead – My personal favourite when using virtual machines is to use a local account. It’s easy to do but is beyond the scope of this guide. I have a step by step guide over on this sites’ sister website here https://athomecomputer.co.uk/install-windows-without-microsoft-account/
Microsoft Telemetry Settings for Virtual Machine
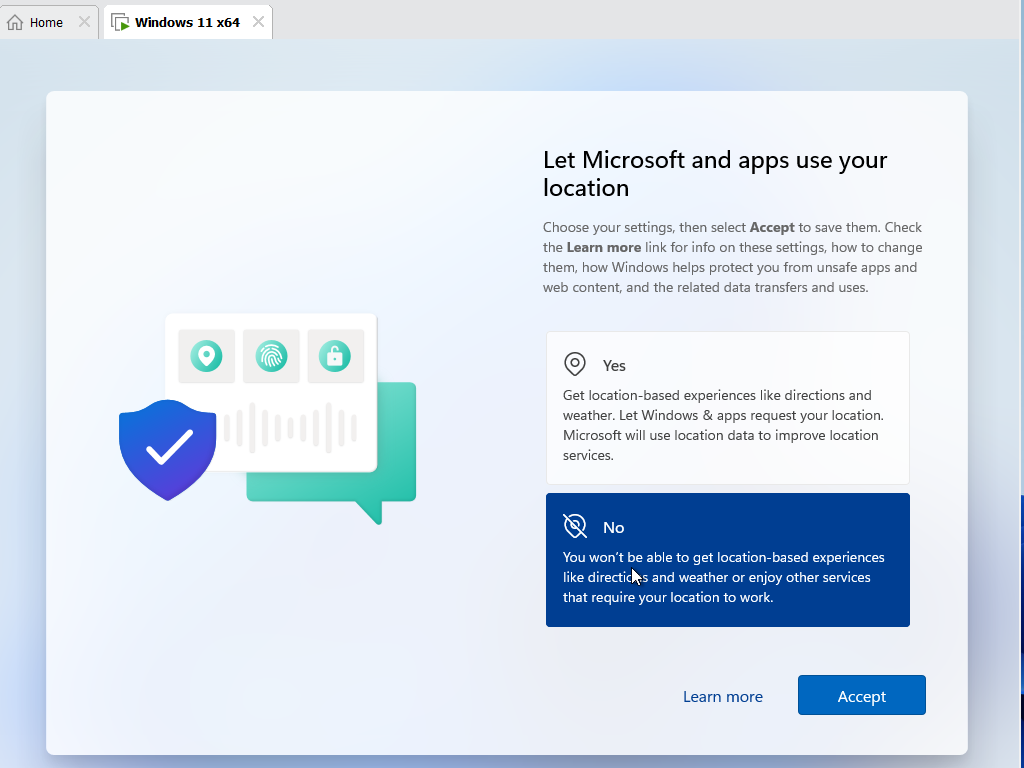
Once you’ve set up an account to use, whether that be an MS account or local account, the next part of setting up the Windows 11 virtual machine will the telemetry settings.
These settings govern what information Microsoft can gather about your activities while using the computer.
They’re completely you’re own choices to make, but I always advise selecting the No or limited.
There’ll be several similar screens to click through.
Almost There
You’re almost there now. After clicking through the telemetry settings, you might see a few screens offering to install Microsoft Office and set up Onedrive as a back up.
Decline all the offers. Office is a trial version and Onedrive is will be more trouble than it’s worth on a VM.
P.S they’ll both require you to sign in with an MS account.
Install VMware Tools
When Windows 11 has finally finished installing, you’ll need to instal the VMware Tools on to it. VMware Tools are virtual drivers that help improve the performance of your virtual machine.
And just like any other computer, they have to be installed onto the system itself.
Summary.
Windows 11 will boot to the desktop. Even though it’s a virtual machine, it’ll work exactly the same as a “real” computer. It’ll have internet access and you can install programs and apps on to it.
The great thing about any VM, regardless of which operating system you use is the security that they offer. In short, whatever you do with a virtual machine, it doesn’t affect your real computer. Good luck with your new project.
Related Posts.
Install Windows 10 VM On Workstation Pro.
Set up a Windows virtual machine on your home computer. It really isn’t that hard to do.
Encrypt the data on removable drives such as USB flash drives.


Leave a Comment